CakePHPでタグ機能を実装する際に便利そうなtag_timeというプラグインがあったので試してサンプルを作ってみました。

サンプルイメージ

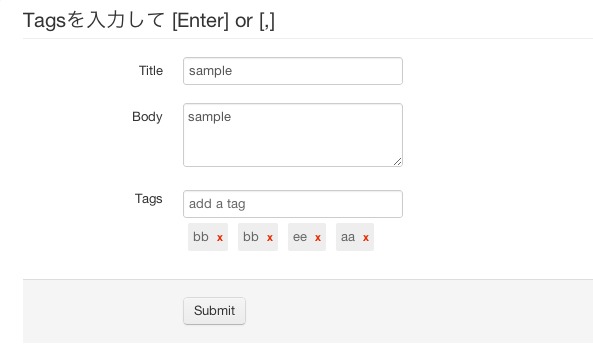
作成するのはこんな画面です。
環境

      CakePHP2.1.2
      PHP5.3.8
      TwitterBootstrap

※サンプルはTwitterBootstrapが前提になっています。

テーブル作成

こんな感じでタグを含むテーブル構成を作成します。

CREATE TABLE IF NOT EXISTS `posts` (
  `id` int(10) unsigned NOT NULL auto_increment,
  `title` varchar(50) default NULL,
  `body` text,
  `created` datetime default NULL,
  `modified` datetime default NULL,
  PRIMARY KEY  (`id`)
) ENGINE=MyISAM  DEFAULT CHARSET=utf8 AUTO_INCREMENT=1 ;


CREATE TABLE IF NOT EXISTS `tags` (
  `id` int(11) unsigned NOT NULL auto_increment,
  `tag` varchar(255) default NULL,
  PRIMARY KEY  (`id`)
) ENGINE=MyISAM  DEFAULT CHARSET=utf8 AUTO_INCREMENT=1 ;


CREATE TABLE IF NOT EXISTS `posts_tags` (
  `id` int(11) unsigned NOT NULL auto_increment,
  `post_id` int(11) unsigned NOT NULL,
  `tag_id` int(11) unsigned NOT NULL,
  PRIMARY KEY  (`id`)
) ENGINE=MyISAM  DEFAULT CHARSET=utf8 AUTO_INCREMENT=1 ;

プラグイン配置

GitHubからプラグインをダウンロードし、プラグインフォルダに配置します。
https://github.com/voidet/tag_time/tree/2.0

bootstrapでプラグインを読み込みます。

CakePlugin::load('TagTime');

Controller

コントローラでは何も難しいことはしません。
bakeした状態で問題ないと思います。


<?php
App::uses('AppController', 'Controller');
class PostsController extends AppController {
	public function index($id = null) {
		$this->Post->id = $id;
		if ($this->request->is('post') || $this->request->is('put')) {
			if ($this->Post->save($this->request->data)) {
				$this->Session->setFlash(
					__('保存出来ました'),
					'alert',
					array(
						'plugin' => 'TwitterBootstrap',
						'class' => 'alert-success'
					)
				);
				$this->request->data = $this->Post->read(null, $id);
			}
		} else {
			$this->request->data = $this->Post->read(null, $id);
		}
	}
}

Model

モデルの$actsAsでプラグインを指定します。
忘れずにhasAndBelongsToManyも指定します。

<?php
App::uses('AppModel', 'Model');
class Post extends AppModel {

	public $name = 'Post';

	public $actsAs = array('TagTime.TagTime');

	public $hasAndBelongsToMany = array(
		'Tag' => array(
			'className' => 'Tag',
			'joinTable' => 'posts_tags',
			'foreignKey' => 'post_id',
			'associationForeignKey' => 'tag_id',
			'unique' => 'keepExisting',
			'conditions' => '',
			'fields' => '',
			'order' => '',
			'limit' => '',
			'offset' => ''
		)
	);
}

View

Viewも特に変更してませんが、Tagの箇所だけ注意してください。

<?php echo $this->BootstrapForm->create('Post', array('class' => 'form-horizontal'));?>
	<fieldset>
		<legend><?php echo __('%s', __('Tagsを入力して [Enter] or [,] ')); ?></legend>
		<?php
		echo $this->BootstrapForm->input('title');
		echo $this->BootstrapForm->input('body');
		echo $this->BootstrapForm->hidden('id');
		
		echo $this->BootstrapForm->input('Tag.tags', array('type'=>'text', 'div' => array('class' => 'tags-input input'), 'label' => 'Tags'));

		?>
		<?php echo $this->BootstrapForm->submit(__('Submit'));?>
	</fieldset>
<?php echo $this->BootstrapForm->end();?>

これで完成です。
簡単ですね。ほとんど自分ではタグに関するソースを書いてません。
表示のカスタマイズ等はcssで出来そうでした。

作成したサンプルはここ
タグの箇所を入力して確認してみてください。

http://sample.b-prep.com/posts

tag time